Sunday, October 10, 2010

Kale Chips


IE - the only good way to eat kale.

If you're not up on your dark green, leafy vegetables, kale is the one with curly ridges on its leaves. I'm pretty sure I never would have tried kale if CCO hadn't made me. It tastes like you'd expect a dark green, leafy vegetable to taste -- slightly bitter with an aftertaste. I would have happily never eaten it again -- because of the curly leaves, kale can be hard to clean, and it's more bitter than some of it's equally-healthy cousins like chard or collards. But our CSA gives it to us frequently and I always feel guilty letting perfectly good vegetables go to waste, even if I prefer their cousins.

Eat Rating: Good. It really is the best way to eat kale. Crispy, tastes like the outer layer of roasted brussel sprouts.
Difficulty: Easy. Very, very easy.

Recipe courtesy Gregg Keckler

1 bunch kale
Olive oil
sea salt

Preheat the oven to 425 degrees.

Wash the kale and then tear bite-sized pieces of the leaves off the stalk. Set aside and let dry for a few minutes (or if you want to be fancy, use a salad spinner).

Lay the kale pieces out on a cookie sheet and drizzle with olive oil. Sprinkle salt to taste over the chips.

Bake for 15 minutes, then remove and let cool. The chips will be crispy and can be stored in a bag for a day or two at room temperature.

Sunday, September 26, 2010

Pears Poached in Reisling


When we were getting ready for our wedding in February, CCO and I decided we'd buy all the wine and beer. It would be cheaper that way, we reasoned, since the caterer would be charging a flat fee per person regardless of whether they had anything to drink. And it was cheaper -- even though in a last moment dash, my dear CCO went out and bought several more cases "just in case."

Unfortunately (or fortunately?) he also forgot to keep the receipt. So after the wedding, we had to keep something like six cases of wine. I'm not really complaining. But there are only so many days you want a super sweet riesling. Unless of course, you also have pears. Then it's quite great that you still have two cases of riesling hidden behind the couch.

Eat Rating: Delicious. Not overly sweet, but a nice end to dinner -- especially if you serve with a square of dark chocolate.
Difficulty: Easy. Requires a vegetable peeler and a melon baller (you could use a spoon)

Adapted from the Food Network

4 pears, any variety
1 750 ml bottle of riesling
2 cups sugar
water

Add the bottle of wine and the sugar to a medium-sized saucepan and whisk to combine. Set aside.

Using a vegetable peeler, peel a pear all the way up to the stem. Take the melon baller (or a spoon) and starting at the bottom, spoon out the core until all the seeds are gone. Place the peeled, cored pear in the saucepan to keep from browning while you work on the other pears.

[LN: the recipe calls for you to take a round of parchment paper and place it over the pears to ensure they are submerged. You could also use a small plate for this.]

Once all the pears are in the wine, check to make sure the liquid is high enough to cover them completely. If it's not, add a little water until they are fully covered.


Bring the mixture to a boil, then reduce heat to a simmer and cook for 20-25 minutes. The pears are done when you can easily insert a knife into the fruit.

Serve immediately or let come to room temperature. Serve with a dollop of whipped cream or a square of dark chocolate.

Pears can refrigerated in the poaching liquid for 4-5 days.

Tuesday, August 17, 2010

Foolproof Gazpacho

You shall have to make do with this picture of tomatoes, dear reader. The soup was devoured before pictures could be snapped.

On days when it's wicked hot, I often can't bring myself to turn on the oven. I turn to cereal or -- if I happen to have some good heirloom tomatoes from the market -- to delicious, cold gazpacho. The soup is best made with heirloom tomatoes, those ugly, weirdly colored tomatoes you used to be afraid of as a kid. I often like to use the yellow heirlooms for gazpacho -- they're a little sweeter than the red or purple kind. But really any of them will do.

This soup can be eaten right away, but it's best if you can make it about 2 hours ahead of time and let it chill in the refrigerator. Don't be afraid to make a big batch -- the soup is actually at its best on the second day.

Eat Rating: Awesome. I have a whole new appreciation for really good tomatoes.
Difficulty: Easy. Requires a blender or food processor.

CCO's recipe

2 lbs yellow heirloom tomatoes (or any kind of heirlooms)
1 large cucumber (You can peel and seed if you want. I like to use the whole thing)
1 purple onion
1-2 jalapenos
Handful of parsley or cilantro
3/4 cup water
3 tbsp olive oil
salt and pepper to taste

Using a knife, cut around the core on the top of the tomato and pull it out. Roughly chop about 2/3 of the tomato and put in a blender.

Cut 2/3 of the cucumber in large pieces and place in the blender.

Cut the onion in half. Roughly chop one half and throw in the blender.

Cut off the top of one jalapeno, slice down the side and remove the seeds. (You should probably wear gloves while doing this). Toss in the blender.

Blend the vegetables to make a rough puree. Pour into a bowl.

Dice the remaining tomato, cucumber, jalapeno and onion into small pieces. You want it large enough to give the soup a nice crunch, but not so large that you have to spend an inordinate amount of time chewing. Add the diced vegetables to the puree, then mix in the water and olive oil. Add salt and pepper to taste.

Chill at least two hours before serving with a dollop of sour cream or croutons.

Sunday, July 25, 2010

Rainier Cherry Sorbet


Cherries -- glistening happy orbs of deliciousness. I love cherries, all kinds. But if I had to pick a favorite, it might be Ranier Cherries, with their skin a soft, pale yellow with a hint of pink, like they're blushing. They're the sweetest of the cherries, great for eating on their own.

Rainier Cherries

A few weeks ago at the farmer's market in Mt. Pleasant, one of the sellers had a few quarts of Rainiers. I bought one, planning on eating the entire quart on my own as soon as I got home.

When I got home, though, I decided to look around and just see if anyone had any good recipes for desserts with Rainier Cherries. The answer is no, not really. Almost all recipes are for Bing Cherries, the deep red kind. This was a problem I could fix.

It was hot out, so I decided some kind of ice cream or sorbet would be perfect. I started with David Leibovitz's recipe for Cherry Sorbet and adjusted it, lessening the sugar to make up for the sweetness of the cherries and scaling it down for the one quart of cherries. The result? Pink, light and perfectly sweet.

Adapted from David Leibovitz, The Perfect Scoop (LN: I highly recommend this book, BTW)

1 quart Rainier Cherries, stems and pits removed
1/2 cup water
1/4 cup sugar
1/2 tsp lemon juice
1/2 tsp kirsch or a few drops of almond extract

Place the cherries, water, lemon juice and sugar in a saucepan over low heat. Cover and cook for 10-15 minutes until the cherries are soft. Remove from heat and cool to room temperature.

Using a stick blender, puree the cherry mixture. (LN: Alternatively, you could place it in a blender to chop up.) You can either puree all the way or puree and leave a few chunks of cherry in there, as I did.

Pour into a glass bowl and refrigerate until well chilled. Place in ice cream maker and use as directed. (If you don't have an ice cream maker, see this post about how to make ice cream without one.)

Eat immediately -- it will be soft like frozen yogurt -- or freeze for 2-3 hours until hardened some and serve.

Sunday, July 11, 2010

Red Currant Jelly


For the past several weeks, they've had currants at the Farmer's Market -- little red, white and pink berries of tart goodness. I had never tried canning with them before. Generally, I stay away from berries with seeds because you have to strain them. But I recently acquired a sieve (it's amazing the amount of random kitchen gear people give you when you get married), so I figured this would be a good first test for jelly.

The difference between jam and jelly -- if you don't already know -- is that jam is made from the whole fruit, while jelly is made just from the juice. So with jam, you throw the fruit in with the sugar and boil until it's ready to jar. With jelly, you place the fruit in a saucepan with water and boil until the fruit has released all it's juice. Then you proceed like you would with jam, adding sugar and pectin to the juice.

Currant jelly is certainly delicious (it's apparently insanely popular in France) -- tart, but a little sweeter than raspberry. I definitely recommend it.

For more on canning, see here.

Adapted from the Ball Blue Book of Preserving

3 pints red currants
1/2 cup water
2 2/3 cups sugar
5 tsp pectin

Remove currants from their stems and rinse thoroughly in a colander. Place the currants and water in a saucepan. Bring to boil and gently crush the berries against the side of the pan with the back of a spoon. Simmer for 15 minutes until the berries are softened.

Allow to cool slightly, then strain the juice through cheesecloth, squeezing as much juice from the berry mass as possible. You should get about 2 cups of juice from the 3 pints.

Place the juice and the sugar back in the saucepan and bring to a boil. Once it's boiling, add the pectin and stir until mixed in. Bring to a full boil and boil for 1 minute. Remove from heat and fill jars.

Waterbath process for 5 minutes. The jelly will keep unopened for up to one year. After opening, store jelly in the fridge and use within 2-3 weeks.

Sunday, June 27, 2010

Rhubarb Lemonade Spritzer


I was actually trying to make this Rosemary Lemon Rhubarb spritzer, but my darling CCO forgot to mention that he threw out my stash of rosemary. (In fairness, it was probably shrivelled since I forgot to put it in the fridge)

So I made the recipe without the rosemary and it tastes just fine.

It also makes a nice gin drink -- but then again I think everything makes a pretty nice gin drink.


Adapted from Simply Recipes

1 lb rhubarb, peeled and cut into chunks
2 cups water
1 1/2 cups sugar
1/2 cup freshly squeezed lemon juice

Combine rhubarb, water and sugar in a saucepan. Bring to a boil, then reduce heat to low and simmer for 15 minutes.

Strain out the rhubarb chunks and stir in lemon juice. Chill until cold, then use in drinks.

Rhubarb Lemonade Spritzer: Fill the glass about a quarter of the way with syrup and fill the rest of the way with chilled seltzer water.

Rhubarb Martini: In a shaker of ice, add equal amounts gin and syrup. Shake and strain into a martini glass.

Rhubarb Gin Fizz: In a shaker of ice, add equal amounts gin and syrup. Shake and strain into a highball glass. Fill the rest of the way with seltzer water.

Sunday, June 6, 2010

Lentil Soup


The first time I tried to cook with lentils, they were downright awful. Okay, slight exaggeration. They were just completely tasteless, totally boring. They were nothing like the first time I had ever had lentils -- a delicious veggie and lentil soup I had at a vegan potluck dinner.

I vowed to try again. After all, they are really good for you. I quickly discovered my problem was I was using brown lentils. They're the most difficult to make tasty, absolute flavorsucks. What I needed were red lentils. After a horrified trip to Whole Foods ($7 for a tiny bag?!), I headed to the Indian grocery in Springfield where an enormous 5 lb. bag only cost me something like $4.

And from there, my love of red lentils began. I was somewhat surprised to discover that when cooked they turn a dull yellow. No matter. Throw in some tomato and the color is restored.

This soup is amazing. I mean so incredibly good you can actually forget for a little while that it's good for you.

I recommend serving it warm with a dollop of yogurt. Or take some day old bread, cut into pieces, toss with olive oil and bake for 10 or so minutes to make croutons. Or really what you'll want to do is eat two bowls -- one each way for comparison. It's like a requirement.

A few notes on preparation: the recipe calls for you to toast whole spices and then grind them in a spice grinder. The freshly roasted cumin and coriander do make the soup sing. But if you don't want to mess with whole spices (or don't have a spice grinder), you could sub ground cumin and ground coriander.


Adapted from The New York Times

Eat Rating: Awesome. It's difficult to put the spoon down.
Difficulty: Easy. To make it smooth, you'll need to puree with either a hand blender (or actual blender). If you don't have one, just leave it chunky. It's good that way too.

2 tbsp peanut oil
1 large onion, diced
4 garlic cloves, minced
2 tsp cumin seeds, toasted and ground
2 tsp coriander seeds, toasted and ground
2 tsp curry powder
1 28-oz can of diced tomatoes, with juice
2 1/4 cups red lentils
8 cups water, vegetable or chicken stock (LN: I did half water-half veggie stock)
1 lime, juiced

In a large stockpot, heat the oil. Saute the onion for about 5 minutes until softened. Add the garlic and cook an additional minute. Add the spices, stirring to coat the onions and garlic. Add the tomatoes and their juice, bringing to a simmer. Cook for 10 minutes until the tomatoes are softened.

Add the lentils and stock. Bring to a boil, then reduce to simmer and cook for 20-30 minutes. You want the lentils softened. They should be a yellow-ish color and easy to mash.

Puree with a hand blender or in batches in the blender. Right before serving, stir in the lime juice. Garnish with yogurt or croutons.

Saturday, May 22, 2010

Korean Seafood Pancakes


Really, I don't just copy The Kitchn. I promise!

A couple months ago, my friends Ed & Kari invited CCO and I over for brunch at their place and Kari made delicious Korean seafood pancakes. Being a cooking nerd, I took notes and photos! I had forgotten about it until recently, when I saw The Kitchn blogging on the same thing. I promise mine is better though.

Say hello to Kari. She uses this Asian pancake mix as the base. You can find it at H-Mart. But really it's just flour with some salt mixed in. So you can just substitute flour and a pinch of salt if there's no Asian grocery nearby.

Anyway, combine your pancake mix with 1 egg and the water. You should use an equal amount of pancake mix and liquid to make the batter. Assume the egg, if using, equals about 1/4 cup liquid. So if you're making two pancakes, use 3 cups mix and 2 3/4 cups water.

Once your batter is made, add in the seafood and stir until well mixed. You can use as much or as little as you want. Kari likes hers with a lot of seafood, so she puts in about 2 cups of frozen seafood mix that includes shrimp and squid. You could also use fresh.


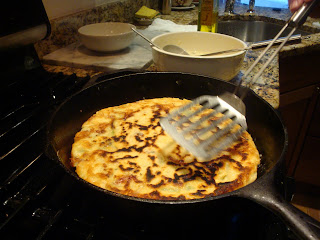
The best pan to use for the pancake is a cast iron skillet. That gives it the nice browned crust on the pancake. After you've mixed the batter, preheat your skillet and grease with about 1 tbsp of oil.

Once the skillet is heated, use a spoon to ladle about half the pancake mix into the skillet.

The batter may be a little thick, so use your spoon to spread the batter out to the edge.


Kari likes to add the scallions on top of the pancake. Once it's cooked for about a minute, lay the scallions on top of the pancake and spoon a little of the batter on top.


We break from our regular scheduled programming so Kari can give a hug to her son, who wandered into the kitchen looking for food.

After the pancake has cooked for about 3-5 minutes, it should have browned and firmed up around the edges. You'll be able to see on the top that it's solid. Use a pancake flipper to lift separate the edges of the pancake from the pan, then flip over. Cook the pancake for another five minutes or so until it's cooked all the way through. You can cut into the middle a little with a knife or the edge of the pancake flipper to check.


Flip your cooked pancake out onto a plate and cut into wedges. Serve with the dipping sauce of soy sauce and rice vinegar.

Sunday, May 2, 2010

Apple Tart


Yes, it did take forever to lay the apples out like that.

When it gets to be springtime, I start getting really antsy about fruits and vegetables. I want them to come now! Now! NOW! and become very disappointed when I go to the farmer's market and my only choice is what type of apple to use.

But I decided to make the best of it and have an apple tart for Easter dinner dessert.

It was a good choice. This tart is only lightly sweet. You sprinkle on about a tablespoon of sugar AFTER you've laid the apples out. As a result, the apples themselves start pretty crisp and provide most of the flavor.

My one beef is with the crust. Yes, it was nice and flaky. But boy was it a pain to roll out and get into the dish. The recipe was actually supposed to make enough crust to make this galette style, ie enough crust to fold over on top of the tart. Partly because I loaned out my good rolling pin and partly because I was being impatient and didn't refrigerate the crust long enough, that didn't happen. If I were to make this again, I might fall back on my mainstay crust recipe. Or, as my friend PJ recommended, I might break down and (gasp!) use shortening.

Simplest Apple Tart, adapted from Smitten Kitchen

Eat Rating: Good. Not amazing. But definitely a solid dessert. The low sugar content was good for my relatives who need to monitor their sugar intake too.
Difficulty: Medium to hard, depending on how diligent you are with laying out the apples.

Crust
1 cup all-purpose flour
1/2 tsp sugar
6 tbsp butter, cut into chunks
3-4 tbsp cold water

Filling
2 lbs apples (about 5-6)
2 tbsp butter, melted
1 tbsp sugar

Place the flour and sugar for the crust in the bowl of a food processor. Pulse to mix. Add the chunks of butter and pulse until a course meal forms. Adding water 1 tbsp at a time, continue to pulse just until the dough holds together. (LN: Alternatively, if you don't have a food processor, mix the flour and sugar in a bowl and use a pastry cutter to work the butter into the flour. Then use a hand mixer to incorporate the water)

Lay out a sheet of waxed paper. Remove the dough from the bowl and mound in the middle of the paper, smashing down to form a rounded disk. Wrap in the waxed paper and place in the fridge for at least a half hour.

While the dough is chilling, peel the apples. Cut in half along the stem. Using a melon baller, remove the core and stem. Laying the apple core-side down, cut the apple into thin pieces from top to bottom. Set cut apples aside.

By now, it should have been about 30 minutes. Preheat the oven to 400 degrees.

Remove the dough from the fridge and roll out. You will be using a 9-inch round tart pan, so you'll want to roll it out large than that by at least 1-1/2 inches (don't forget it has to go up the sides). (LN: You really do want to use a round tart pan. I was stuck because I have a 9-inch square and a 10-inch round. I went with the 9-inch square, and, as you can see above, there wasn't enough dough for the top overhang.)

Once it's rolled out, lay into the bottom of the tart pan, allowing the excess to hang over the sides. Lay out the apples. The easiest way to do this is to take each apple-half and fan it out so each piece overlaps the next a little (LN: This is also much easier to do when you're working with a round pan than when you're working with a square).

After you've laid out all the apples, take your melted butter and lightly brush the apples with it, reserving a little bit for the crust. Sprinkle about 1 tbsp of sugar over the apples. Gently fold the excess dough back over the top of the tart. Brush the crust with remaining butter and sprinkle lightly with sugar.

Bake for about 45 minutes, making sure to rotate the tart every 10-15 minutes so that it browns evenly.

Remove from oven and cool completely before trying to remove the outer tart pan (LN: I've made that mistake before. Not pretty). To remove the outer pan, place a sturdy can -- like a can of diced tomatoes or pumpkin -- on the counter. Set the tart on top. The tart should sit on top of the can, and the outer layer will fall to the counter.

Serve the tart warm or at room temperature, preferably with vanilla ice cream.

Wednesday, April 21, 2010

Asparagus Carbonara


All work and no cooking makes Leah a dull girl.

It also makes her spend way more time/money at Teaism than is healthy for a normal human being.

Often when I get home in the evening at 8 p.m. (or later), I have little desire to cook. One can only make scrambled eggs so many days, though, before a certain CCO begins to protest. Then, one has to get creative with the egg recipes. ;)

In the vein of the Honest ABE, I present to you the Asparagus Carbonara.

Eat Rating: Delicious. Nothing goes better than asparagus and bacon.
Difficulty: Very easy.

1 lb of asparagus, ends trimmed
4 slices of bacon, diced into small pieces
2 eggs
1/2 cup of parmesan cheese
3/4 lb of long pasta such as spaghetti or fettuccine

In a skillet, cook the bacon pieces until browned. (LN: Alternatively, you can cook the bacon in whole strips and then chop it. It's quicker with the little pieces, though.) Drain on a paper towel and set aside.

Cut the asparagus into 1 - 1 1/2 inch chunks. Set aside.

Bring a large pot of water to a boil. Add the pasta and cook until there are 2-3 minutes left on the recommended cooking time. Then add in the asparagus.

In a small bowl, beat the eggs and mix in the cheese.

Once the pasta/asparagus is done cooking, drain in a colander. Place the pasta and asparagus in a large bowl and add in the bacon pieces. Pour the egg mixture into the hot pasta and toss with two forks or tongs. Serve immediately, topped with parmesan or red pepper flakes if you like.

Saturday, April 3, 2010

Leek and Potato Braise


I never ate a leek until I was 25. That's probably a little bit odd. But my mom never cooked with them when I was a kid and then I once read that book, the one about how French women are so much better than everyone else because they understand portion control. One of her techniques was to make yourself an enormous pot of leek soup -- just leeks, water, salt -- and eat that for entire weekends. The idea of eating nothing but a glorified onion and water for 48 hours straight horrified me. Whenever I went to the grocery store, I could never look at leeks without thinking of them as a dieting aid a la Slim Fast.

So I stayed blissfully ignorant of their true potential until CCO bought them one day and added them to something -- fried rice, I think it was. That was when I discovered they weren't half bad. Not like Slim Fast at all.

A couple months back, one of the bloggers I follow decided she would try a bunch of recipes with leeks. I was intrigued. Perhaps leeks could be not just "not bad" but actually good. So I made this Leek and Potato Braise for one Meatless Monday and I am now a leek convert. This recipe cooks the leeks and the potatoes slowly for nearly 2 hours. At the end you have a creamy deliciousness, with just hints of spiciness for the leeks. I think I've made this about four times in the past three months. The only downside is it takes a while to cook and if you're very hungry, it tempts you horribly by filling up your entire house with a delicious smell of leeks cooking. We've eaten this several times as a main dish. It's also great as a side.

From All About Braising by Molly Stevens Via The Arugula Files

Eat Rating: Awesome.
Difficulty: Easy. It just takes awhile. You'll need some kind of casserole dish with a tight-fitting lid.

3 large leeks, washed and trimmed
2 1/2 pounds yukon gold potatoes (that's about 5 medium sized ones)
1 1/2 tsp fresh thyme, chopped (LN: or sub in 1/2 tsp dried)
1 1/4 cup stock, chicken or veggie
1/4 cup cream

Preheat oven to 325 degrees.

Cut the leeks in half lengthwise almost all the way through, then chop into half inch pieces. Set aside.

Peel the potatoes, then chop into 1/2 inch pieces. Add to the leeks and place in the bottom of your casserole dish. Add the thyme and salt and pepper if desired and toss to cover.

Place the stock in a saucepan and heat just until boiling. Pour over the potatoes and leeks. Cover the dish with the lid and place in the oven. Cook for 45 minutes, then remove lid and stir. Replace lid and cook for another 25 minutes.

Increase temperature to 425 degrees, then add the 1/4 cup of cream and give it a good stir. Cook another 30 minutes until the liquid is absorbed and the tops have begun to brown. Remove from oven and serve immediately.

Thursday, March 11, 2010

Southern Chocolate Layer Cake


It's true. My layer cake looked nothing like the gem that appeared in the New York Times. But, in my defense, that lady has been making them for something ridiculous like 70 years. And even if it wasn't a looker, it sure was delicious.

Since I'm nothing if not ambitious, I knew as soon as I read the NY Times piece on southern layer cakes that I had to try my hand at it. So when my mom asked what we should have for dessert with Christmas dinner, I naturally insisted it should be a 15-layer cake. Naturally.

Sadly, because of operator error (see above) and inexact measurements, I only ended up with a nine-layer cake. But after all, it was just my first attempt.


Eat Rating: Delicious. The thing I liked about this cake is there is plenty of icing the soaks into the layers, but its not overwhelmed by the icing like some cakes are.
Difficulty: Medium to hard. It certainly is a production. Requires three cake pans, sifter, hand mixer (or Kitchenaid) and parchment rounds.

Adapted from The New York Times, Dec. 15, 2009

Cake
1 cup (2 sticks) of butter
2 1/2 cups granulated sugar
1/3 cup of shortening (LN: I, stupidly, assumed my mom would have shortening on hand and didn't pick it up at the store. We subbed another 1/3 cup of butter)
5 eggs
2 tsp vanilla extract
5 cups cake flour (LN: I used all-purpose)
2 tsp baking soda
5 tsp baking powder
2 cups milk

Frosting
5 cups granulated sugar
1/3 cup cocoa
1/2 cup (1 stick) butter, cut into pieces
1 15 oz. can evaporated milk
1/2 cup milk (LN: The recipe calls for whole. I subbed 2 percent)
2 tsp vanilla extract

Preheat the oven to 400 degrees.

Liberally grease three 9-inch round cake pans, layer with a round of parchment and grease again. (LN: Don't skip the parchment! It really helps because you're going to need to re-use the cake pans and it's much easier than washing them between layers)

Place the butter, shortening and sugar in a bowl and cream with electric mixer. Add the eggs one at a time, beating between each addition. Mix in the vanilla. Set aside.

In a separate bowl, sift the flour, baking powder and baking soda. Gradually add the flour mixture in batches to the cake base, adding 1/2 cup of milk in between each round of flour until fully incorporated.

Beat the cake batter for approximately 5 minutes until it is smooth. Add 3/4 cup of batter to each cake pan and bake for 6-8 minutes until cooked through (LN: in my oven, it was more like 10-12 when I baked all three layers at once).

While the cake is still warm, flip it out onto a paper towel or rack. Re-butter and line your cake pan and stick another set of layers in the oven. You should ultimately do four rounds of layers, end up with 12 total. (LN: Unless you have mess ups like I did, in which case you may only have nine layers).

While the layers are baking, start the icing. Place butter, sugar, cocoa, milk and evaporate milk into a large saucepan. Bring to a boil. Boil for 4 minutes. Reduce heat to simmer, add vanilla and then cook for an additional 10 minutes. You want the icing to be the consistency of hot fudge sauce. Don't overcook. The icing will firm up some as it cools.

Once the icing is finished, place one layer of the cake on a serving plate. Top with 4-5 tablespoons of icing. Add another layer. Repeat until all the layers have been added. Pour the remaining icing over the top of the cake, allowing to drip down the sides. Serve with vanilla ice cream.

Sunday, February 28, 2010

Vegetarian Squash Casserole


In anticipation of our honeymoon extravaganza to the Big Easy, CCO and I decided to go vegetarian for a month. Although we've been eating vegetarian once a week for Meatless Monday, doing it all day everyday was a challenge at first. (There are only so many days in a row you can eat eggs before it gets boring...)

So CCO suggested we pick up a copy of The Moosewood Cookbook. When he had been a vegetarian during his college days at Harvard, it was his stand-by. Once I finally found a copy, I could see why. There are tons of suggestions for how to move to vegetarian without eating a salad every night (though there is a great chapter on salad). One section that caught my eye was the one on baked dishes, in particular this squash casserole. It's super easy and most things you'd probably have in your house anyway.

If you want to make this, I'd suggest it as a side dish along with something else. If you want it to be the main feature, serve it with crusty bread or pita, something else that has some texture and substance. My one criticism was that everything was so smooth, it was a little like eating baby food (very delicious baby food, but baby food nonetheless).

Eat Rating: Delicious. The squash complements nicely with the tanginess of the yogurt and feta.
Difficulty: Easy.

Adapted from The New Moosewood Cookbook by Molly Katzen

4 cups cooked squash or pumpkin, mashed or pureed (LN: I used acorn. You could also do this with butternut)
1 tbsp olive oil
1 onion, chopped
2 small bell peppers, any kind, chopped
4 cloves of garlic, minced
1/2 cup yogurt (LN: She recommends using firm Greek yogurt. It worked find with plain Yoplait)
1 cup crumbled feta cheese
1/2 cup walnuts, chopped (optional)

Preheat the oven to 375 degrees.

Heat the olive oil in skillet and saute onions and bell peppers until vegetables begin to soften. Add garlic and cook until vegetables completely softened.

Place the mashed squash in a large bowl. Add the onions and peppers, yogurt and feta and mix until well-combined. Spread the casserole into a 9-inch square baking dish (or comparable) and sprinkle the walnuts over the top.

Bake for 25 to 30 minutes or until the casserole is thoroughly heated and bubbling. Serve immediately with some crusty bread or warmed pita.

Friday, February 19, 2010

Tuesday, February 2, 2010

It's a Recession: Homemade Tortilla Chips


I don't know about you, but I seem perenially incapable of finishing an entire bag of corn tortillas. I like to get them to make enchiladas (they taste much better with the corn tortillas than with flour, in my opinion), but a batch for two people only makes a small dent in the bag. The solution? Make tortilla chips.

Eat Rating: Awesome. A nice bit of crunch
Difficulty: Super easy. An 8-year-old could do this (provided she doesn't burn herself putting it in the oven. That was always my problem as a kid...)

5 corn tortillas
1 tbsp vegetable oil
2 tbsp sea salt

Preheat oven to 350 degrees and line a cookie sheet with parchment paper .

Using a sharp knife or a pizza cutter, cut each tortillas into six triangles. Place the triangles in a small bowl and drizzle the vegetable oil over them, tossing so each piece is well coated. Lay out the chips on the cookie sheet and sprinkle with salt. Bake for 25 minutes or until the chips have begun to brown. Remove from the oven and let cool about 5 minutes before serving.

Variation: Cinnamon Chips
Omit salt. Mix 3 tbsp sugar with 1/2 tsp cinnamon. Sprinkle cinnamon sugar over the chips and follow remaining steps.

Saturday, January 23, 2010

Wedding Cake Project: Wild Blueberry Pie


I know what you're thinking. "Did I read that correctly? It says wedding cake and pie." Yes, you did read it right. In addition to the delicious Guinness Chocolate Cake, we will be serving wedding pie of the homemade variety. I'm not completely crazy. Wedding pie is a thing. And though my love of pie knows no bounds, I did not ask CCO on our first date if we could serve pie at our wedding like this guy. (Though it was one of the conditions I set on having the wedding at all)

CCO's family lives in Maine, so we figured wild blueberry pie was a nice way to celebrate his New England heritage. After a thorough search, I discovered you can buy frozen wild blueberries at Whole Foods. So I bought a bag, whipped out Mark Bittman's How to Cook Everything and whipped up a pie.

Nicole, with disaster pie.

It looked good but it was something of a disaster. It tasted delicious, but it was more like soup than pie, with tons of blueberries swimming in juice left in the dish. Now I understand some people love their blueberry pie to be soupy. But when people are dressed in their Sunday best and I'm wearing white, I'm not sure soupy blueberries are the way to go.

The culprit, I discovered, was the cornstarch. If cooked for too long, cornstarch loses its thickening power. Couple that with the extreme juiciness of wild blueberries and you get soup. For round two, I settled on instant clearjel. Like cornstarch, clearjel is made from corn. But it's essentially a higher grade of cornstarch than what you buy at the grocery store and it thickens much better.

Since this is supposed to be a fancy-ish pie, I used Meyer lemon zest. I'm sure regular lemon zest would do just fine if that's what you have on hand.

P.S. Happy blogiversary! Thanks to all my loyal readers. We've come a long way since Raspberry White Chocolate Bars. What has been your favorite recipe of the last year?

Eat Rating: Awesome. Very blueberry with a hint of lemon.
Difficulty: Easy.

One batch of double pie crust (LN: I recommend this one via Smitten Kitchen. You could also try doubling this.)
1 15 oz. bag frozen wild blueberries (LN: You can sub 2 1/2 cups fresh)
Zest of one Meyer lemon
1/4 cup sugar + 1 tbsp for the top
3 tbsp ClearJel
1 egg

Preheat your oven to 400 degrees.

Lay out one pie crust in the bottom of your pie dish.

In a small bowl, mix the 1/4 cup sugar with the zest of the Meyer lemon. In separate large bowl, mix the blueberries with the sugar and ClearJel. Let stand at least five minutes. (You can start work on your top crust while this is steeping.)

After five minutes, place the blueberries into the pie dish. Top with second crust, either in a lattice (as shown) or place over the top and cut vents.

Beat the egg in a small bowl and brush on top of the top crust (Note: If you're doing a lattice, brush with the egg BEFORE you place on top of the pie. It's much easier that way). Sprinkle the last 1 tbsp of sugar on top of the pie and place the whole pie dish on a cookie sheet.


Bake 10 minutes at 400 degrees, then reduce heat to 350 degrees and bake for an additional 40-50 minutes. You want the top crust to be browned and the blueberry mixture to be bubbling. Remove from oven and cool. Serve warm or at room temperature.

Monday, January 11, 2010

It's a Recession!: Cashew Butter


Ok, so cashew butter is probably not a household staple. But peanut butter is. And while I love the stuff -- grilled peanut butter shall always be Elvis and my favorite sandwich -- after awhile it gets old. So I decided to switch it up a little and try cashew butter. Cashew butter has a much more subtle taste than PB. It's more mellow and doesn't hit you over the head with its nuttiness. The recipe calls for unsalted cashews. They sell big bags at Trader Joes. But if you can't find unsalted, go ahead and get the salted kind and just rinse them off in a colander.

Adapted from Chocolate and Zucchini.

Eat Rating: Awesome.
Difficulty: Easy to Medium. Requires a food processor or blender
2 cups unsalted cashews
Salt, to taste

Heat your oven to 400 degrees. Place the cashews in a single layer on a cookie sheet and bake, stirring occassionally, for about 8-10 minutes or until the nuts become fragrant. You want them lightly roasted.

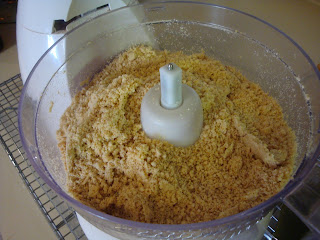
Remove from oven and allow to cool for five minutes. Place the nuts in the food processor and pulse to break up. You'll have, at first, a sort of course meal.

Keep pulsing, stopping ocassionally to scrape down the sides of the bowl with a rubber scraper. The nuts will continue to break down and eventually begin to form a paste. Taste and add salt if desired.


The paste is somewhat thick and a little more crumbly than traditional peanut butter. Once it reaches desired consistency, place into a jar or plastic container and refrigerate. The butter will keep in the fridge for a few weeks.